fbpx

How To Easily Make Beautiful And Inexpensive Shutters

Hi friends! At Gray Clover Home our goal is to help you to design and create your best life and home! We love to create, build and design and live life to the fullest and want to help you do the same. Life can be very full at times so how do you create and live your best life? In bite sized chunks! Making small changes and updates, one at a time, will completely transform your life and your home. Let’s get started!

For our very first blog we thought we would share how to make the easiest shutters ever! And they barely cost anything except some time. Are you ready to update the exterior of your home? YES? Fantastic! Let’s get started.

Where to start? When we went to make shutters for the Pawnee Cutie (Our fixer-upper) we didn’t want to spend a fortune. A short trip to the hardware store and we found the best option – Natural Cedar Dog Eared Fence Picket Boards. They’re the perfect size to make these easy shutters and come in 6′ lengths so will work for most windows.

Check out our two short video tutorials to learn more:

Today we are going to talk about my 3 easy steps for creating the organized closet of your dreams!

Once you’re done with the shutters – you will want to make sure to nail the cross slats on from BOTH sides. This makes them stronger. Then choose your favorite stain color and viola! New Shutters for you!

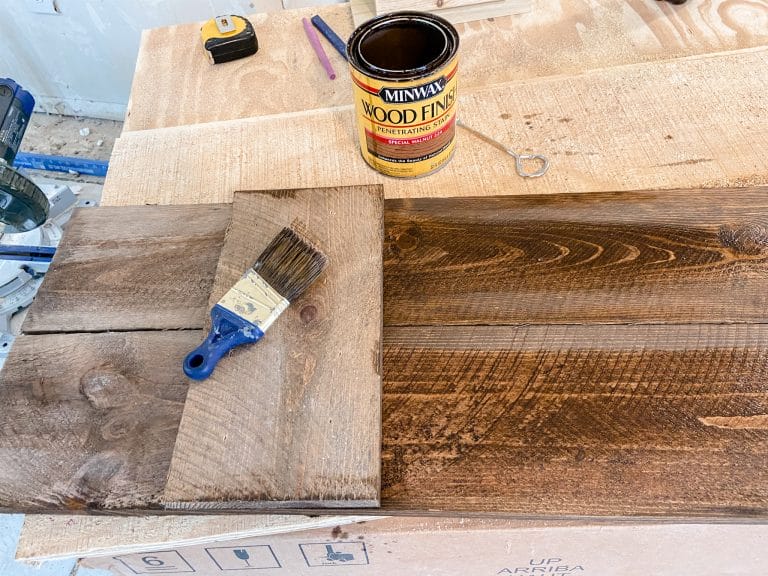
Our favorite stain color is MinWax Special Walnut 224. It is absolutely gorgeous on every wood we have used it on. It’s warm and inviting with a hint of red but not too much. Here you can see the small sections we started staining. Even though the cedar itself is beautiful, adding a stain to it makes them look polished and it will protect your new shutters from the weather.

Are you ready to see the ALMOST finished product? (We still need to finish the sidewalk, trim and a bit more!) We have been working on the “Pawnee Cutie” and the outside is starting to look pretty good! Here is the fun we’ve been having:

  • Trimmed the overgrown shrubbery
  • Painted the outside
  • Added new windows
  • Replaced the front door
  • Added trim to the front door
  • Installed Cedar Shake up on the peak
  • Installed new trim on the peak
  • New roof was added
  • The AMAZING shutters added that extra touch to make it pop!

Here are the before, During and After Pictures.  (Before on the left – overgrown and plain – During on the right before the cedar shake and the new windows)

Thank you for watching and we will see you again SOON! In the meantime, make small changes every day to make your house the home you’ve been dreaming of!
KB & Q (Keith & Susan)

3 Step – Easy Closet Organization Hacks!

It is so true that every minute spent organizing will give you an hour. And one of my favorite places to be organized is in my closet!

Today we are going to talk about my 3 easy steps for creating the organized closet of your dreams!

This is WAY easier than it sounds! You start with the first piece and keep going until you get to the last piece. LOL! Yes, I realize you may have hundreds of items in your closet but it doesn’t need to be done all at once – you can do it over days or even weeks. With each piece, pause, take a QUICK moment and ask yourself three questions: (Note, don’t agonize over it, your first instinct is usually the right one)

  • Will I ever wear this again?
  • Have I even worn this in the last two seasons where I could have worn it?
  • Does it make me smile?

If the answer to one or more of these questions is NO, then it has to GO! Set it aside for donation so that someone else can love it! Once you’ve gone through everything, move on to the next step.

Organize your clothes and other items in your closet & put the same type of items together. For each type of item, decide the following:

  • What do I want to hang?
  • What do I want folded?
  • Which items do I use most frequently?

Once you’ve decided WHAT you’re going to do with each type of item, the fun part begins! Let’s move on to the FINAL STEP:

You’ve kept only the pieces you like, organized them by type and decided HOW you want to put them in your closet. Now it’s time to make magic! Let’s take a look at some ideas for what we want to DO with our belongings:

  • Start with the hanging items. If you want them to look incredibly neat and clean, choose the same type of hanger for all your hanging items (It sounds crazy but it looks amazing!). For mine, I chose a thin hanger because I have LOTS of items hanging and it gives me extra space. For Keiths’, I chose a thicker white hanger (and am thrilled that all of his finally match!) – it looks good and is an inexpensive choice. As you’re hanging items up, sort those items by style & color. For example: Shirts, Long Sleeved and then by color. Then do the short sleeved by color and sleeveless by color. I can’t tell you HOW much easier it makes it to find what I’m looking for!
  • Move on to your folded items – again, make sure you’re putting the same kinds of items together. Folded items have so much versatility – you might fold them in a drawer (if you don’t have all your drawers in the closet, put the items you use most frequently in the closet and the other items in the bedroom) You may also put them on a shelf or in some sort of bin! Think about how you get dressed in the day and which items you’ll need access to on a regular basis.
  • Now for the items you use most frequently – put those in a top drawer or a bin that you can easily grab. Take some time and really think through this. If the items you grab the most are easy to get, you’ll save time in your day not having to search through.
HAVE FUN and enjoy your new, organized closet!!!
Add to cart